5 - Bonnet Assembly
5 - Bonnet Assembly
- HOW TO MAKE A NATIVE INDIAN HEADDRESS / WARBONNET ? -
Feather Slits:
The task of measuring for the feather slits on the crown is a bit tedious, but it is important so that the feathers will be uniformly spaced on both sides of the crown. Excellent results are achieved when the feathers are spaced the same distance apart from front to back. Because there may be some trail-and-error in this process, we recommend you make a paper pattern the same size as the crown and first use it to measure and mark lacing slits until you are satisfied with the spacing of the slits. If you do not use a pattern, you may end up with lots of confusing marks on your actual bonnet crown.
First, the crown must be completed as far as described at the beginning of the Construction instructions. Next, consider how many feathers you have (not counting the Major Plume). Of course, if you have a Center Feather, the first pair of slits will be centered directly above the center of the brow band.
Now you must measure the distance around one side of the crown. The slits should be ½” above the brow band and, further around, ½” from the bottom edge of the crown. (See Fig. 9-40) We suggest you use tailor’s chalk and draw a line along these landmarks. Then begin measuring by starting at the center above the brow band, following the brow band to its end, angling past the outline for the medallions (r end of the brow band) down to about ½” above the edge of the crown, then on around to the back center of the crown. It is possible to do this with a cloth measuring tape, or use a non-stretchy cord of some sort and measure the distance you find by using the cord like a measuring tape around the crown.
Dividing the total length by the number of feathers on a side will tell you how far apart the slit pairs should be. For example, if the distance around one side of the crown is 13 ½” and you have 15 feathers on side, divide 13 ½” by 15 to yield 0.9”. Round this up, and the distance from one pair of slits to the next will be 1”. (Actually, the marks you make will be the center point for the pair of slits, with one slit being on each side of the mark.) Since 15 feathers x 1” = 15” and your circumference is only 13 ½”, we recommend spacing the feathers in the front of the bonnet ¾” apart, then spacing the feathers on back at 1” or so. This is require some trial and error. Remember that the distances you decide on will also be used to space the feathers on the other side of the bonnet.
If you have 31 feathers – which include a center feathers – make a chalk mark at the front center ½” above the crown, then make another mark ¾” from it and continue with dots at ¾” spaces but then graduating to 1” spaces after you get past the medallion area. The last pair of slits on each side should be ½” from the back center. (This way, the back two center feathers – one from the left side and one from the right – will be 1” apart.) Go back and count the number of slit pairs to make sure the number equals the number of feathers you have. If the number of slit pairs does NOT equal the number of feathers, you have made a mistake somewhere and need to refigure your total distance, check your arithmetic, re-measure the slit pairs distances, or all three. In any case, you will have to re-measure and make new marks.
However, if you have an even number of feathers in the bonnet, consider that the front two center feathers will be a total of ¾” apart. Therefore, the first pair of slits above the brow band should be 3/8” from center, and the remainder will still be ¾” apart, etc. Again, the last pair of slits on the back center will be ½” from center.
Note: The tedious part comes from doing the arithmetic and arriving at a hard to measure distance between feathers (11/16”, for example). In this situation, experiment with rounding the number to the next smaller one-eighth inch; in this case, 10/16” = 5/8”. Here, you would space the feathers 5/8” apart from the front center and on around to a point on the crown somewhere after you go past the end of the brow band and onto the edge of the crown. From the point, you can re-measure and divide by the remaining number of feathers and find a comfortable spacing for the remaining feathers. This will probably mean that, like the example above, these back feathers are a little bit further apart than the ones on front, but this will not be noticeable in the completed bonnet.
Once you have determined the slit spacing for one side of the bonnet, it will be easy to measure and mark the other side. (Fig. 9-40)
Cutting Slits:
Each of the two slits in a pair of lacing slits should be ¼” apart and no longer than ¼”. Ideally, the slits are just long enough for the lacing to pass through snugly. Find the first mark in the front center, and then cut a slit on either side of it so that the 2 slits are ¼” apart and no longer than ¼” in length. We recommend that you use a craft knife or very sharp pen knife to make these cuts. Place a block of scrap wood inside the crown and cut through the crown material into the wood. By using the wood, you will be much less likely to make an error and cut a big slit, when you only intended to make it ¼” long. Cut all the slits for each side.
Finishing the crown:
In the Historical Section, we discussed various ways of covering the crown. This includes covering the entire crown with colorful material, sewing on strips of fur, or sewing on small plumes or body feathers. After the crown slits are cut- but before the feathers are laced on – is a good time to finish these crown decorations. You also should locate the position for attachment of the Major Plume and make slits in the top of the crown for it loop attachment. But do not tie on the Major Plume at this time.
If you wish to stitch on fluffies, select those which have a thick quill tip. Most of the quill tips of small fluffs are flimsy and eventually will split and pull off.
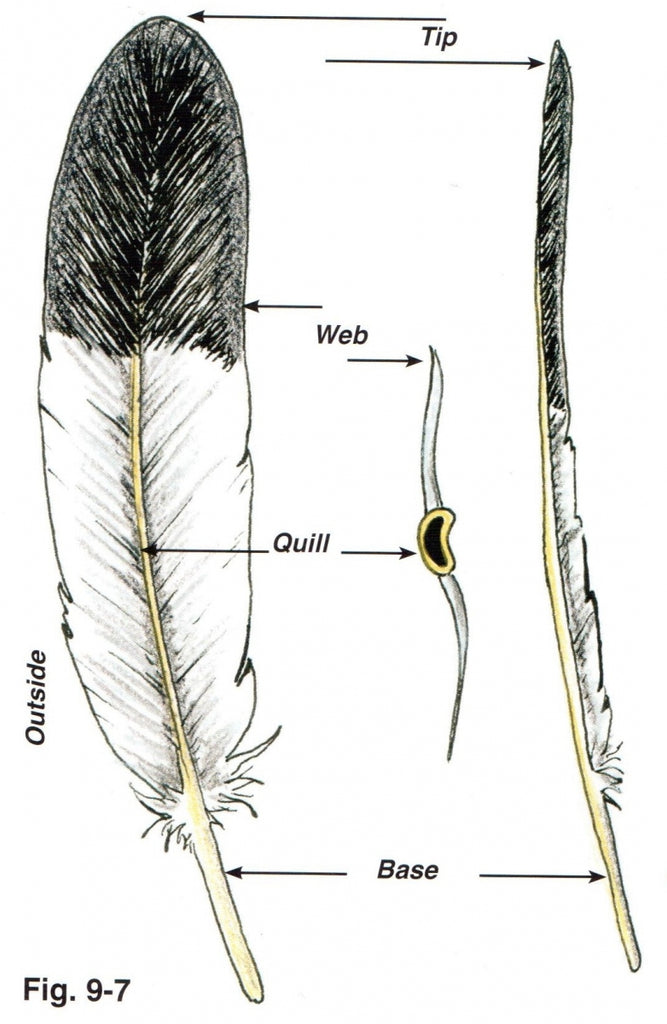
If you use secondary wing feathers, their quill ends should be big and strong enough to cut and make self-loops. It is best to start with a full-sized feather and cut the webbed tip off so that the finished feather (after the quill is made) is 4”-6”. This allows for the full use of the “hollow” end of the quill to make a self-loop.
Stripped quill feathers were popular for crown decorations and are fun to make. The accompanying photo series shows this technique. (Fig. 9-41 a thru f) First, select 2-3 dozen secondary wing or tail feathers approximately 6” long (or, no longer feathers, cut the feather tips off square so that the entire feather is approximately 6”). Next, strip the webbing from top to bottom, as follows: with the front of the feather facing you, grab the webbing at the top and as close as possible to the quill on either side with both hands. While holding the feather steady with the left hand, carefully begin to pull the webbing down the quill with the right hand. Pull in short increments. The webbing should all stay in one piece, held together by the thin strip of tissue that attached the bottom of the webbing to the quill. Strip the webbing down to within 1” of the bottom of the webbing. Now, use your left hand and strip down the webbing on the opposite side. When the webbing has been stripped on both sides, simply cut off the bare quill just above the loose webbing.
To attach the feathers to the crown, first other-wise complete the warbonnet, then untie the eagle feathers at the back center. This will allow you to lay the tail feathers away from the bonnet for greather accessibility to the back of the crown.
After all your feathers are prepared in this manner, use Rit (TM) dye to dye the feathers an appropriate color, if desired. Be sure to dye the feather after stripping the web, so that the exposed quill area also is dyed. Set the dye with vinegar, as per the dye instructions, then rinse thoroughly until the water is clear. Pat the feathers fairly dry, then allow them to dry completely by laying them out on newspaper.
Now cut self-loops in the ends of the quills, as illustrated. (Fig. 9-42)
To cover the crown with small trim feathers, start about 4” above the bottom of the crown and stitch or lace on a row of feathers. Add another row 3” -4” above the first, and so on, until you have covered the top and back of the crown. The finished effect will be somewhat like having a feather duster on the crown. (Fig. 9-43)
A quick, modern way to cover a crown is to use small 2” fluffies. These are simply glued on one at a time, and this can best be done before lacing the eagle feathers to the bonnet. Glue these on by placing a drop of glue on the front of the fluff (as opposed to the inward curved back side). This way, the fluffs will curve out and away from the crown. Note: Do not place them closer than 2” from the slits where the eagle feathers are to be mounted. For the best effect, attach the fluffs in rows, with a slight overlap, similar to shingles on a roof. Start along the bottom and work up. These can cover the entire crown or merely the top and back.
If you plan to add a Major Plume, leave space for it and add it before tying the warbonnet back together.
Lacing on the Feathers:
Select you Secondary Lace material at this time. Old Timers used a very thin piece of brain-tanned buckskin, as it is very strong, even when cut thin. A convenient material for Secondary Lacing is simulated sinew. If you use it, buy the full-thickness type. Also, a double thickness of kite string is a cheap substitute but probably will not last over the years. When unwaxed string or buckskin is passed through the hole in the quill, the feather will not slide freely once the feather is in position. However, when using simulated sinew, you should plan to go through the quill, then make a half-loop around the quill and go back through the same hole (Fig. 9-44) This way, the half-loop can be pulled tight after the feather is in its proper position, and the feather will not slide out of place in the future. This method, while giving desirable results, is very tedious to work with when it comes time to lace up the feathers and then later adjust them.
The thong used to lace the feathers to the bonnet is called a Primary Lace. A very good primary Lace can be made from buckskin, and even a standard leather boot lace will do. Buckskin is more supple, however, and will not cause the “buckling” of the crown between the slits like you will get with a thick boot lace. Of course, select a lace that is 1”-2” longer than the circumference of the crown.
- Bring the lace through one of the front center slits until you have reached half its length. Then run it through the loop of the first feather and back into the adjacent slit. As you lace on the feathers, keep the lace straight so that it has no twists in it. Lace the feathers on somewhat loosely, as you can tighten them later. (Fig. 9-45)
- Lace on all the Lefts, then go back to center and finish lacing on the Rights.
- When you have done both sides, both ends of the lace will be on the underside of the bonnet. Simply tie them together with a loose knot, as you will retie and trim the ends later.
- The Secondary Lace should be strung through the quill of each feather at this time. Use a large needle (e.g, a Darning Needle) and a pair of pliers to pull the needle through the hole you made in each quill 4” above the loop. This is a tedious task, as you must be very careful that the lace does not pull any of the fluffie into the lace hole. (Fig. 9-46)
- Start at the front center and work toward the back. As you lace on each feather, position it so that it very slightly overlaps the feather next to it. In other words, the edge of the webbing that is on the side nearest to the brow band center should overlap some of the webbing of the feather next to it. After lacing on the last feather on the back of one side, do not tie off the lace but go back to the front center and lace on the feathers for the other side.
- When all the feathers have been laced, the bonnet should appear as in this illustration. (Fig. 9-47) Now, bring the back center feathers together by joining the Secondary Lace ends with a loose knot. Do not cut off any excess Secondary Lace at this time.
- Now go back and tighten the Primary Lace. Start at the front center and work back toward the end of the brow band. As the feathers descend around the end of the brow band toward the crown edge, the lacing should be loose so that the entire feather can fall back toward the back of the bonnet. When you reach the first feather at the edge of the crown, you can make the lacing a little tighter, just loose enough so that the feathers can move freely.
- After adjusting the Primary Lace on the both sides, tie the ends together with a square knot and clip off the ends leaving a couple of inches from each lace.
- Observe how the feathers fall. It is helpful to have someone seated who wears the bonnet while you make the final adjustments. With attention to the Secondary Lace, go back and adjust any feathers as necessary for all the feathers to be evenly spaced. Again, the feathers on the front half of the bonnet must be slightly overlapped. You may find that, for the bonnet to fall the way you want it to, you need to space the back feathers so that they barely touch, and this perfectly okay.
- Now for the “Wind Test”. With the bonnet on someone’s head, see if you can take your hands and make the feather circle collapse on all sides so that the feathers all point to the ground. If you can do this, then this is the look you will have when a big gust of wind blows the bonnet down over your head. When you can do this to your feathers, the Secondary Lacing is too loose. Simply go back and readjust all your feathers so that they are closer together. Start with the feathers on the back half and adjust them first, then try the Wind Test, and adjust either the back or front feathers as necessary to prevent this potential problem.
- When you are satisfied with the spacing of the feathers and, overall, how the bonnet looks, then you can permanently tie off the secondary lace and cut off the ends (again, leaving a couple of inches of loose ends).
Attach The Major Plume:
Remember that, earlier, you cut a pair of lacing slits in the top of the crown for the Major Plume. Use a thin, short thong and tie it into place. () Tie it fairly sungly or else the Major Plume will flop around and end up sticking out of the side of your bonnet.
Side Drops and Rosettes:
See the Historical Section for the discussion on options for Side Drops. Contemporary fur strips are usually whole ermines or rabbit strips, while historic bonnets used ermine tubes.
White Rabbit Fur Drops:
If you wish to use strips of rabbit fur, prepare them at this time. You will need:
- Rabbit hide with white fur (with few or no holes)
- Red wool or felt for “firecrackers” (optional)
- Soft leather for lace attachments
- Colored thread for “Thread Bands”
- Additional supplies: glue, needle, red thread (optional)
- On the leather side of the hide, measure and use a pencil to draw the layout for the strips. The long dimension of the strip should run in the same direction as the Fig. 9-49
You can see that the strips will have various lengths after they are cut. They can be used this way or cut to a uniform length after cutting the strips from the hide. A minimum of four strips is needed, but you can use more if you like. It is also possible to sew two short strips together to make one long one, if necessary.
- Use a single edge razor blade or Xacto knife to cut the strips. (We recommend that you cut the hide outdoors to avoid having rabbit fur all over your house.) The fur lies in one direction, so start at the “top” to make your cuts. Be careful NOT to cut the fur, just gently cut through the hide itself.
- If you wish to have strips of the same length, determine that length, mark the strips, and cut them off at the “bottom” – again not cutting the hair. Thoroughly shake out all strips and remaining hide before bringing them back inside.
- For an economy bonnet, the strips can be sewn directly to the crown. Hold the top of a strip on the inside of the crown. Usually, these strips are sewn on one at a time next to each other, not all together in one bunch. The edge of the first strip should be even with the end of the brow band. The use of thread similar in color to the color of the crown will make the stitches less obvious.
- To make fur Strip Drops, Proceed as follows:
- Cut a piece of red material 1 ½” x 2” for each fur drop. Lay out the red material so that the 2” dimension is up and down and the 1 ½” dimension is the width.
- Trim the rabbit fur short at the top 1 ½” of the strip. Apply a thin layer of glue evenly with an artist’s brush to the trimmed area and press that end of the strip onto the red material and directly in its center.
- Cut leather laces approximately ¼” x 4”. (Make at least ¼” wide, no thinner.)
- On the leather side of the fur strip, at the top, apply a line of glue approximately 1 ½” long down the center. Then press one end of the lace into the glue. The other end of the lace will extend out of the “firecracker” are approximately 2 ½”.
- Prepare all the strips as above and allow the glue to dry completely.
- Now, start at one edge of the red material and roll it in on itself toward the other edge which should result in a red “firecracker”.
- While pinching the firecracker in one hand, take colored thread (usually white, yellow, or goldenrod) and wrap ¼” wide thread bands around the material, with one band near the top and a second band near the bottom. Or you may use red thread to sew up the back of the firecracker and not use thread bands.
- Complete all the drops as above. (Option: Instead of ending up with a single lace coming out of the “firecracker” that will be sewn to the edge of the crown, you can double the leather into a loop and glue both ends onto the fur. Drops made like this will, of course, require a separate thong and an awl to poke holes in the crown edge to facilitate lacing the individual drops in place.) (Fig. 9.50)
Ermine Tube Construction:
Supplies Needed:
- Ermine hides (with or without heads or tails)
- Soft buckskin from which to cut thongs
- Piece of Black Bear or Skunk Fur (black)
- Red Wool: 1 ½” H x 2” W (one for each tube)
- Heavy colored Thread for firecracker wrap
- Alternate: Red sewing thread
- Craft Knife
- Scissors
- Ruler & Pencil
- Size 12 Sharps needles
- Size “D” Nymo (or smaller)
- Straight pins
- Spray bottle of rubbing alcohol
- Thick cardboard (12” x 12” or larger)
Ermine tube are smaller, thinner versions of a case-skinned hide. They are the ermine drops most commonly seen on older bonnets, were used by many tribes, and they often were used on war shirts. (Fig. 9-51) The drawings in the Exhibit IX illustration set show the following construction steps: Each tube is made from a long narrow section of ermine hide having a faux (“Fake”) tail with black tip using bear or shrunk hair. The hide strip is sewn right-side-out into a tube, around a thick leather thong that runs the length of the hide strip plus 6” or so extending beyond the top which is used as a tie to attach the tube to the bonnet crown. To the other end of the thong is secured a tuft of black hair extending out of the bottom of the tube and which simulates the tip of an ermine’s tail.
This technique of tube making uses ermine hides without heads or tails. If you have a hide with a tail, you can use the tail for at least one strip from the center of the hide. You can then use the faux tail method to make tubes from the remaining hide pieces or buy separate tails for each strip. However, most of the original ermine tube had faux tails.
A single ermine hide usually yields 3-4 tube strips. You may use it with the head attached or choose to cut it off. If cased, slit the hide lengthwise down the center of the belly (or use a hide already split this way), (IX-A) Use a spray bottle filled with rubbing alcohol to completely dampen the inside of the hide. (IX-B) Next, pin the hide to a thick piece of cardboard, gently stretching it as much as reasonably possible to remove any wrinkles. (IX-C) The quickly evaporating alcohol allows the hide to dry in a short time.
Remove the pins, then use a pencil to draw a line on the leather side from the center of the neck down to the center of the base of the tail. Measure across the hide at its narrowest point and divide by ½” to find out how many strips you can get from that hide. Using the center line as a reference, mark points across the bottom and top of the hide at ½” intervals, then connect the top and bottom marks. (IX-D)
Next, use a Xacto(R) knife or single edged razor blade to cut out the strips. Start at the head end and slowly cut toward the tail. Lift up the top of the hide with your left hand as you cut with you right so that the hide is not laying flat on a surface. This will prevent your cutting the actual fur. After all the strips are cut, measure the shortest and cut the other strips to that length (again, just cut the hide and not the ful.) Or you may determine that you wish to hang the drops from the bonnet graduating from the shortest at the side to the longest drops toward the back, etc. Also, if you have some short strips, you can carefully sew pieces together to make a longer strip. (See Sewing information in the following paragraphs.) Use your imagination to make as many strips as you need and to make the most of the materials at hand.
(See IX-E) Now cut a thick, soft leather thong that is ~6” longer than the hide strip for which it will be used and stretch it out. It forms the core around which the ermine tube will be sewn. However, the thong should not be so thick that it completely fills the inside of the tube, as this will make it tedious to sew up the tube.
Next, create the black tail tip approximately ¾” – 1” long. This requires the use of black bear or skunk fur. (Rabbit hair is too fine and too short, and horse tail hair is too coarse.) Tie a knot with thread to anchor the thread to the end of the thong, then carefully wrap on a sprig of hair. Too much hair looks inappropriate, so experiment to find just how much hair you need to make the tip look natural. When satisfied, you can apply a drop of craft glue to the thread wrap and allow it to dry. If necessary, you can shape the “tail tip” by trimming the sprig of hairs with sharp scissors, but do not overdo this or it will not look natural.
The next step is to sew the hide strip into a tube with the thong inside. (IX-F) Because ermine hide is so thin, we suggest using a sharps needle and size D or smaller thread (smaller is better). Use the single thread method (as opposed to doubled thread). Position the thong so that the thread section of the hair tip is just above the bottom end of the fur strip. Start sewing at the “head” end of the strip and include some stitches to secure the thong inside the hide tube. Use a baseball stitch and gently sew the hide lengthwise with stitches ¼” to 3/8” apart. As you tighten the thread, work to avoid pulling ermine hair into stitches. We suggest making three or four loose stitches, tightening the first two, then making more stitches, etc. It is much more tedious to tighten each stitch as you go. Except at the start of your sewing, do not attempt to have the stitches catch the leather thong, as it merely hangs loosely inside the tube.
Tip: After stitching the thong to the top of the hid tube, place a heavy weight on the free end of the thong. This will provide some resistance to work against as you manipulate and sew the tube. Finish sewing up the tube.
After the tubes are completed, prepare red wool wraps for the firecracker section at the tops and apply them as you did the wraps for the bonnet feathers. Attaching the tubes to the bonnet is simply a matter of using an awl to poke holes along the edge of the crown, then inserting the thong end from the outside and tying two adjacent ties together on the inside of the crown.
Attaching Side Drops:
If you use ribbons, rabbit fur drops, real ermine tube drops, or similar materials; they should be attached at this time. As per the above instructions, they usually are not attached in clusters but, rather, side by side from the brow band on back. Sew the drops to the inside of the crown. For fur drops with a single lace that extends from their tops, the laces can be sewn to the crown, or a hole can be poked above the edge of the crown. Poke the lace through the hole and tie a knot a knot in it or tie it to the lace of the drop next to it. Leave enough slack so that the drop can dangle feely.
Attaching Medallions:
Remember that, after you sewed on the brow band, you positioned the medallions so they overlapped the ends of the brow band, and then drew a pencil line around the medallion edge where it overlapped onto the crown. (Fig. 9-52)
Place one medallion in position, then begin sewing the medallion to the crown with needle and thread. Use a small sewing needle and doubled thread that is the same color as the background color of the beadwork. If part of the medallion extends beyond the edge of the crown, then you will only sew around the upper portion; you do not need to sew across the lower portion of the medallion to secure it to the bottom edge of the crown. Make running stitches between the 2nd and 3rd row of beads. (Whipstitching around the edge of the beadwork looks messy.) The portion of the stitch that is on the bead side needs only be 1/16” of an inch or so, and then on the inside of the crown go ¼” or so to make the next stitch. This way, there is very little thread on the beaded side, and it is less likely to show.
Option: For quilled wheels or quilled medallions, mirrors, etc., these do not need to (or cannot) be sewn to the crown. Instead, use an awl to pierce the backing of the mirror (first remove the mirror itself) or medallion with two adjacent holes near the center and run a 4” or longer thin thong through them. (Use a big needle for the leather backing on the medallion.) Then poke corresponding holes next to the end of the brow band, run the laces through those holes, and tie them together with a square knot on the inside of the crown. Beaded medallions can also be attached in this manner, but they tend not to look as good as ones that are sewn on.
It’s Done:
So, now you’re done! But, is any project ever really finished? You may make changes, deletions, or additions to the drops to drops on your bonnet. Or you may wear it awhile, then decide to adjust the feathers so that the bonnet lays or falls differently. Nevertheless, please consider your warbonnet as a living thing and treat it with the respect it deserves. Not only will the bonnet last indefinitely, but, in this way, you will be giving proper respect to its historic significance and the warriors of old. After all, your bonnet represents a REAL warbonnet.

